


Let there be magical snowflakes, hot tea, arty adventures, a good book, some hot soup, a warm quilt, and possibly some homemade bread, because that’s what snow days are for!
Author: Dianne
Road Trips
It’s no secret I like to go on adventures. I’m the kind of gal who can hop in the car and go for a drive, not knowing where she is actually heading, taking turns here and there when the fancy strikes, and have the best time ever wherever I end up! Jamison isn’t as much of a free spirit as that, he likes to have a more definite plan, and though Lex was more that way when she was a kid, now her anxiety doesn’t really like completely unscripted adventures either, but that doesn’t mean we don’t have them from time to time, and they usually can be convinced to come along for one of my little flights of fancy.
And that brings us to our upcoming adventure…
I’ve never been out West. The furthest west I’ve been is Louisiana and Arkansas. I’ve pretty much covered the Eastern Seaboard from Maine to Florida and all the states from Indiana over to Maine, Arkansas over through the Carolinas, Louisiana over to Georgia, in short, I’ve got the East Coast covered. I’ve been to 25 states. But now we’re going to add about 12 new states, not to mention countless cities I’ve always wanted to visit, sites that are calling, and who knows what we’ll stumble upon along the way.
There are a few things we know for sure we’re going to see, but there aren’t definite set plans, except for going to see Jamison’s mom in her new home in New Mexico, and going to see the aliens in Roswell, and a few others spots we really want to see. Two weeks of pure, fabulous, road trip bliss! Good Mexican food, local treats, regional favorites, and who knows what else?
This is going to be fun! Now waiting until we leave is the hard part. I’m never good at waiting. Mid March hurry along!
Happy Blogaversary to Me!
12 years ago today, I started Dianne’s Dishes. I had been blogging recipes on my “personal” blog for some time, but I decided to make a blog that was completely dedicated to my love of all things food and thus Dianne’s Dishes was born. Over the years I went from posting a recipe every day, to once a week, to now where my blog is more of a repository to look back on, though I do still blog recipes once in a blue moon. The blog has grown and changed, just as I have grown and changed. It’s been an outlet for me in so many ways and I’ve enjoyed the ride and the people I’ve met along the way. More to come in the future. I’ve been kicking around some ideas. For now, a toast to Dianne’s Dishes…I hope you’ve enjoyed the journey.
A Little Test

I’m experimenting with adding a photo directly to the blog instead of using another host. Look at me! 😉
So here’s a little conversation with Baxter this morning:
*We go upstairs to grab something and as we’re coming back down, crazy dog jumps down 6 steps to the landing.*
“No! We don’t jump down multiple stairs! Crazy dog!”
“But I’m Super Puppy! I can leap buildings in a single bound!”
“No! No jumping! Ever! We take each stair one at a time in an orderly, non jumping fashion.”
*Dramatic puppy huff* “You never let me do anything fun.”
“I know little man, I’m the mean mom. But you know my rules, no emergency room visits! That includes crazy dogs, not just humans.”
I swear if he could roll his eyes, he’d be doing it! But look at this face!
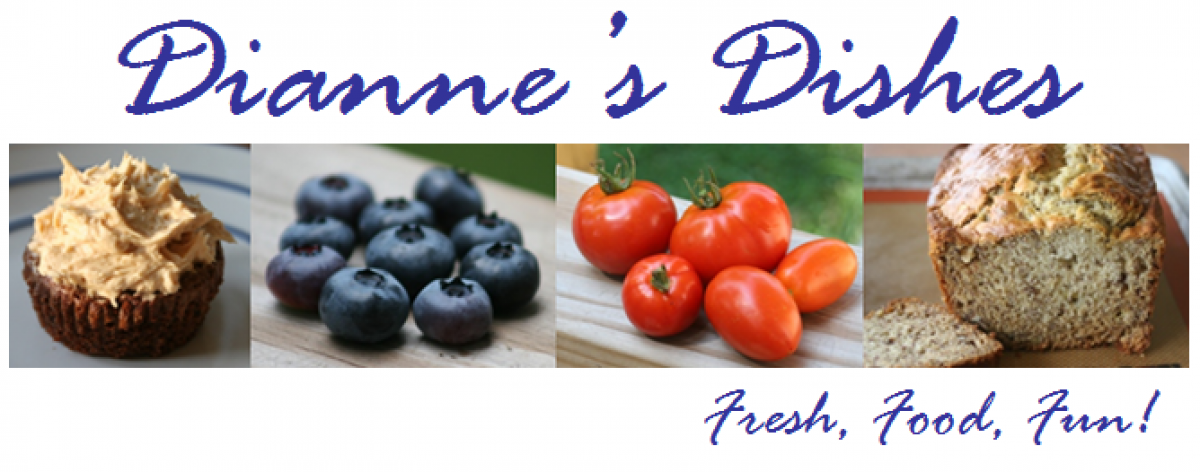
Unwrapped Eggroll Bowls
I love a good eggroll. Pork, chicken, shrimp…it doesn’t matter, but a really good eggroll is high on my list of things I search out. That being said, it’s extremely hard to find a really good eggroll. Some are greasy, some are tough, some taste weird. The perfect eggroll isn’t greasy, it has a crispy shell, but is easy to bite in to, and most importantly, the flavor has to meld. You can’t have too much of one thing, or another, that overpowers the rest.
There are a few places around here that make really good eggrolls. I know exactly where they are, and of course I make several varieties once in a blue moon, but I’m not going to lie, they’re messy, so I don’t make them often, yet oh so worth it when I do! 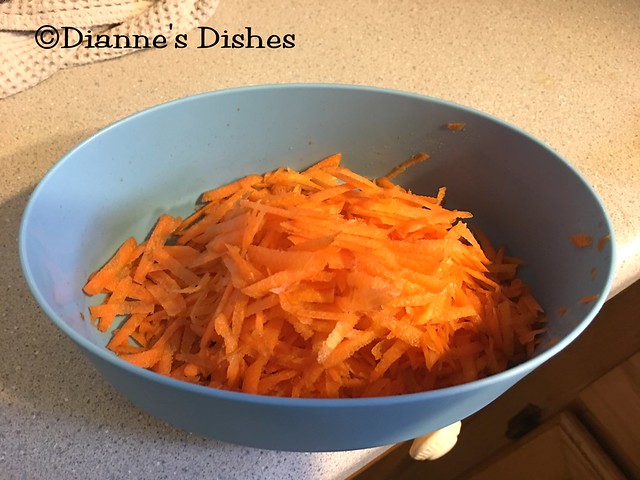
This version takes the filling of the eggroll and allows you to tweak it any way you like, without frying, and without the mess. You can add in the things you like, and season it the way you want, and you have a healthy, meal in one bowl sort of dish, that is just perfect when you’re in a hurry, like say a weeknight. Try it…I think you’ll love it!
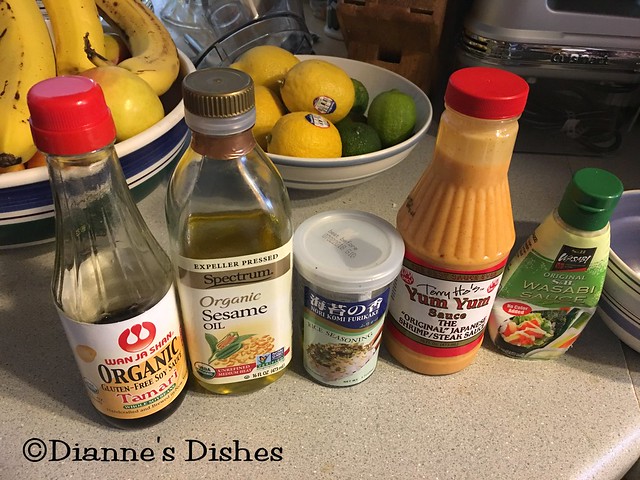
What You’ll Need:
Meat of your choice: Ground pork, shredded chicken, shrimp, etc.
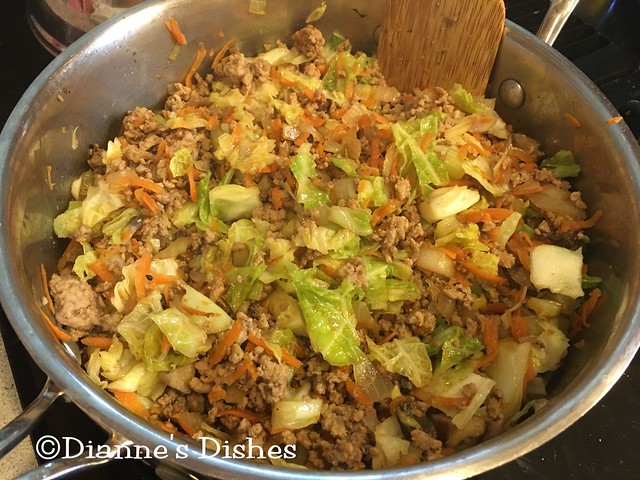
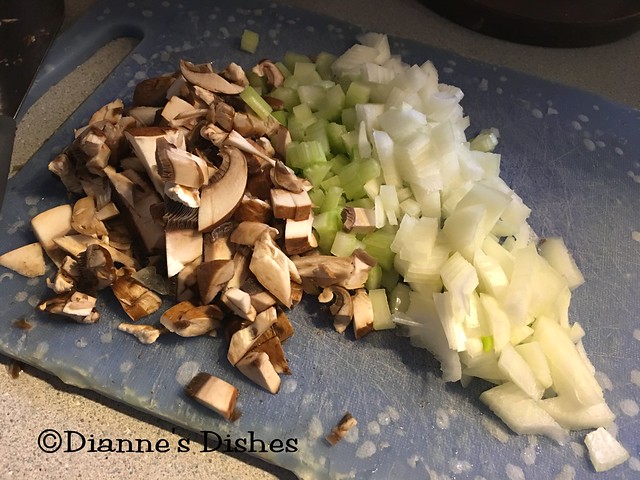
Vegetables of your choice: Shredded carrot, chopped cabbage, chopped onion, chopped celery, chopped mushrooms, shredded potato, etc.
Soy sauce
Rice wine vinegar
Sesame oil
Sea salt
Ground Pepper
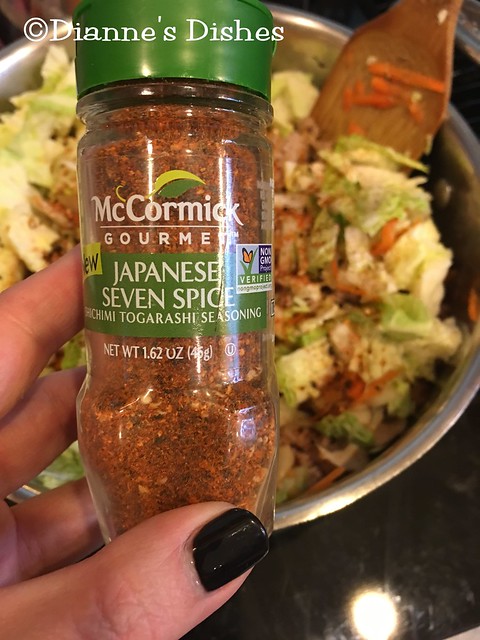
Seasonings of your choice: I like Japanese 7 Spice and hot garlic chili oil
Toppings: Furikake, Yum Yum Sauce, Wasabi, etc.
In a large skillet, brown your meat in a little sesame oil, with some salt and pepper.
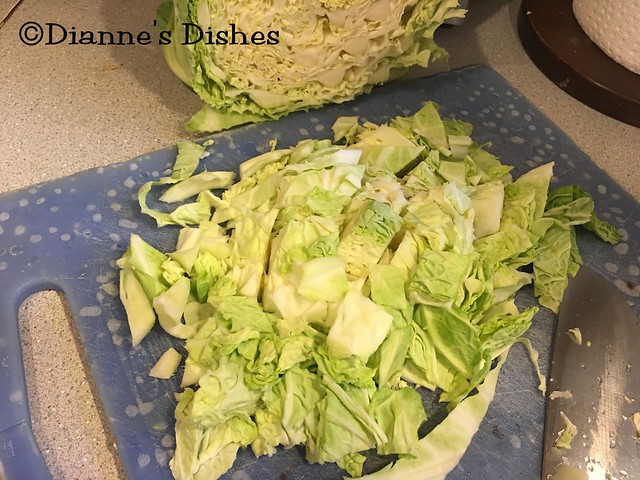
Add vegetables, a generous splash or two of soy sauce and rice wine vinegar and saute until vegetables are tender. Season with salt, pepper, and other seasonings, such as Japanese 7 Spice or chili oil, if you like.
To serve, scoop some of the mixture in to a bowl and top with furikake, Yum Yum sauce, Wasabi, a bit more soy sauce or rice vinegar, more seasonings, whatever you like.
Notes: This really is a mix and match dish. There are no wrong answers. If you like it, then add it in.
Gluten Free Pizza Crust
When we found out Jamison was allergic to gluten, we had to learn a lot of new things. One of his main food groups was bread. On top of being a picky eater, his diet consisted mainly of meat, potatoes, and some form of bread. We go through stages where we make a lot of homemade pizza, so that was one of the first things we tackled on the gluten free path.
At first we tried a few homemade gluten free crust recipes. None of them really were that great. Then for a few years we used King Arthur Flour’s gluten free mix, which is pretty good, but when I found Namaste’s Perfect Flour Blend and we haven’t looked for another variety. It’s perfect for gluten free! I’ve made his pizza crust, cinnamon rolls, and yeast rolls with it, and they’ve all turned out very well. I highly recommend this blend.
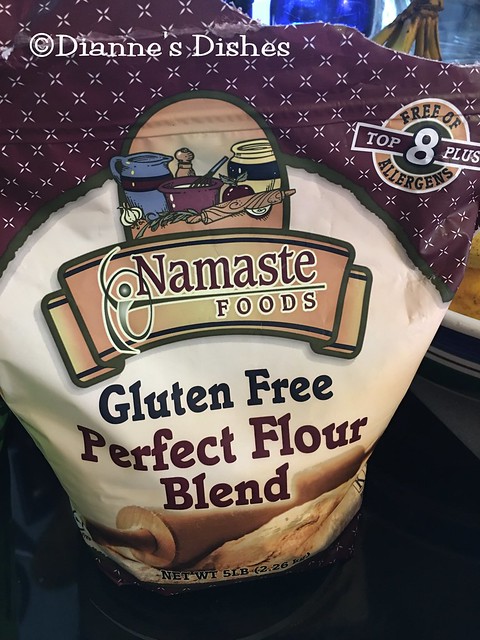
When Jamison first had to go gluten free, the ingredients were grainy and lacking. That slowly has begun to change over time and this blend is one of the most regular flour like things I’ve used. If you’re allergic to gluten, or eating gluten free, this is the pizza crust for you!
What You’ll Need:
4 cups of Namaste Perfect Flour Blend
1 tablespoon of organic cane sugar
1 tablespoon of yeast
1 teaspoon of sea salt
1/4 cup of olive oil
2-3 cups of warm water
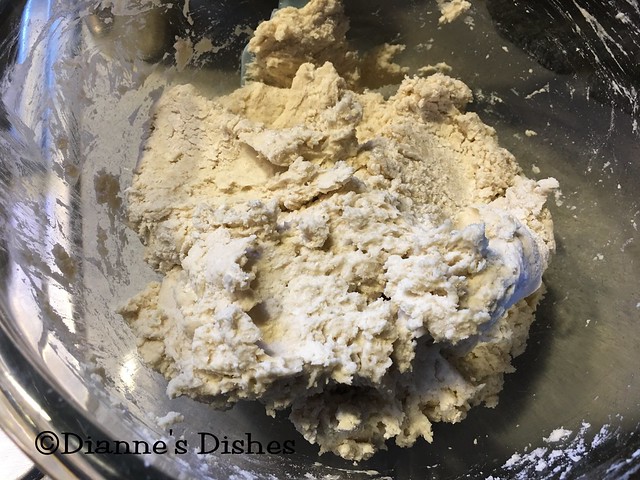
In a large bowl stir together the flour blend, sugar, yeast and sea salt, until will mixed. Add olive oil and 1 cup of the water and begin to mix. Keep adding water until a shaggy dough forms and all the flour is incorporated. As with things of this nature, you may need some, or all of the water. It differs from time to time, based off of humidity, etc. and once in a blue moon, you might even need a bit more water than what is listed above. Listen to your dough.
Once the dough looks like the picture above, you can let it sit for 30 minutes to an hour, or you can use it immediately.
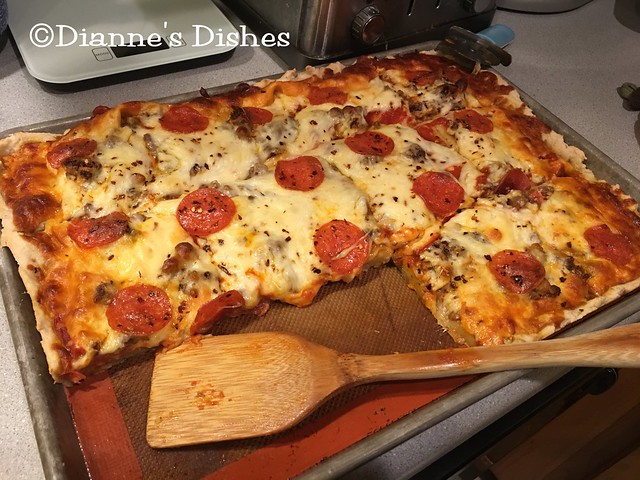
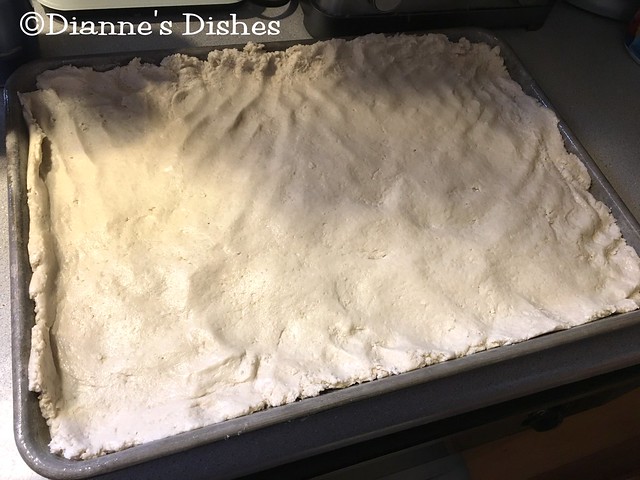
I usually use a half sheet pan for Jamison’s pizza. When you’re ready to make your pizza, preheat your oven to 425 F and spray your baking sheet (and your hands) with some nonstick spray before you spread your dough on your baking sheet:
Top with your favorite toppings and bake for 15-20 minutes in a preheated oven until edges are golden brown.
Notes: No notes for this one.
Comment Issues
If anyone has tried to make a legitimate comment in the past few months, I apologize. I’ve been MIA as some of you well know, and I didn’t have it in me to go fishing through all the thousands of old comments to look and see if anyone actually posted something real.
New entries are coming soon, including gluten free pizza crust, and an Instant Pot Enchilada Soup, among others. Stay tuned.
If you’ll excuse me, this little guy needs a lap nap.

Chocolate Soufflés
I’ve always had a thing for soufflés, chocolate soufflés to be exact, but I’ve never made them. There are a lot of things in the culinary world that people attach myths to, soufflés being one of them. The lore with soufflés is that they’re incredibly hard to make, near on impossible in fact. You end up with more ruined soufflés, than actual successes. Me? I bought in to that. Silly really, when they’re actually a lot easier to make than some might want you to believe.
This month for Baking on the 15th I was the host, and I thought it was time to tackle my fear of soufflés. I became Soufflé Girl! (Sorry, I couldn’t resist a Doctor Who reference, I just couldn’t.) Not only was it much easier than I expected, I would happily make these again. I decided to go with “Individual Chocolate Soufflés with Vanilla Bean Custard Sauce” (aka crème anglaise) from The Joy of Cooking by Irma S. Rombauer, Marion Rombauer Becker and Ethan Becker. If you’re unfamiliar with this cookbook, it has an interesting way of writing things up, some argue confusing, but it’s one of the few cookbooks I actually still have a copy of, though I’ve never used it. Thankfully Kelly went through and typed up the recipe for me, since Jamison was having his first of several oral surgeries when the big reveal occurred, and cleared things up a bit as she went. This made it easy to print out and hang up for easy reference while baking:

I’m getting attached to this method of recipe gandering. 😉
First let’s talk ingredients:
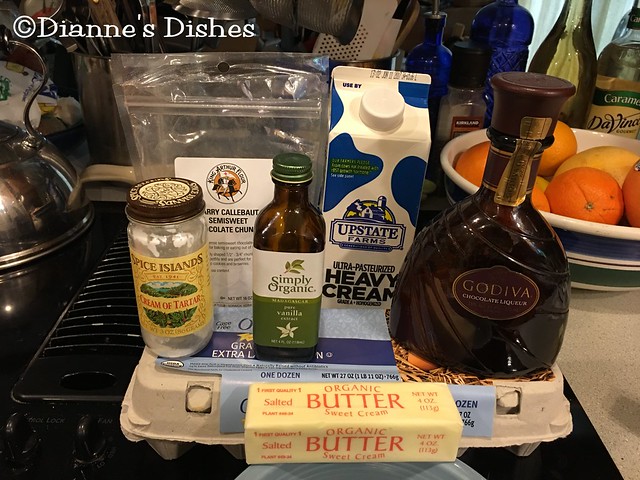
The recipe called for coffee, rum, or water, but as I loathe coffee, and I wasn’t feeling the rum, while thinking the water was too bland, I decided to use some chocolate liqueur instead. I had originally thought chocolate vodka, but I realized I was out when I ventured out to the freezer. I remembered I had some Godiva liqueur in the cabinet and went with that instead and as I expected, it turned out pleasantly well.
The recipe said to place the bowl with the chocolate, liqueur and butter in a skillet of water, and I thought that was weird, so I did a double boiler set up instead:
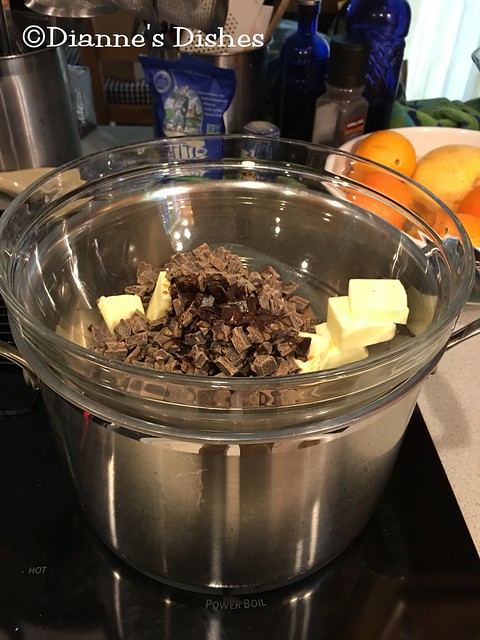
I like double boilers. They make sense to me. I was worried about scorching the chocolate the other way, though I’m sure it would have worked. Maybe.
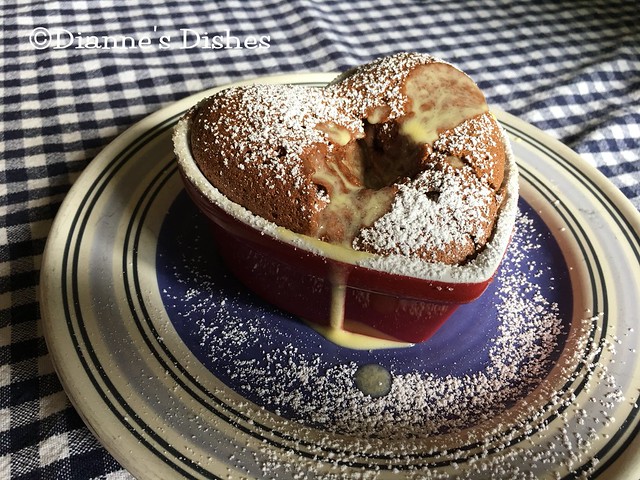
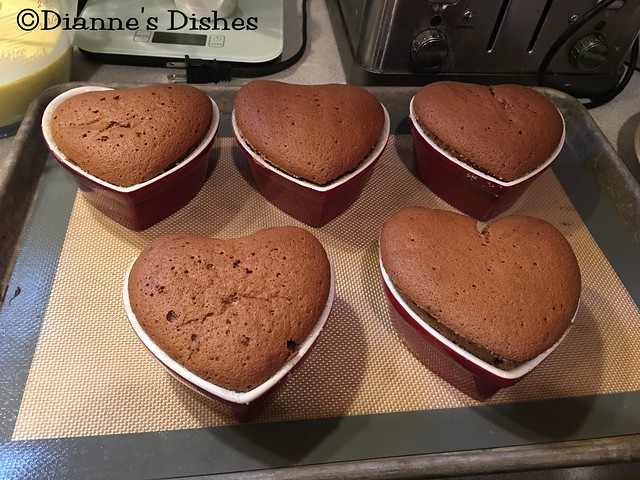
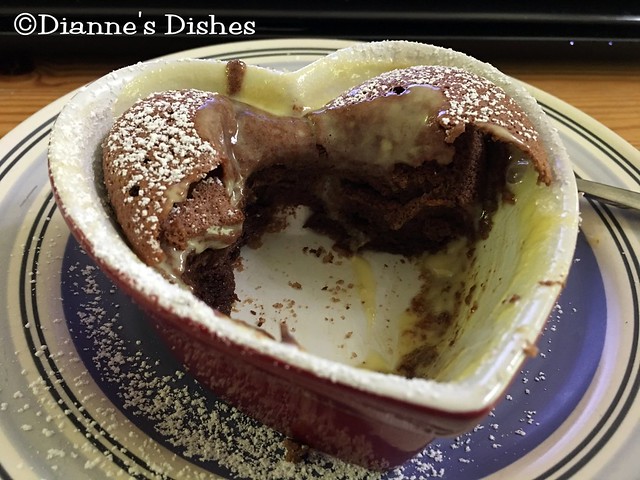
The recipe calls for using 10-11 ounce ramekins. I’m not sure what size me ramekins are. I’ve had them forever and they aren’t stamped on the bottom. I ended up using two different kinds to use up all the batter. Here they are buttered and sugared:
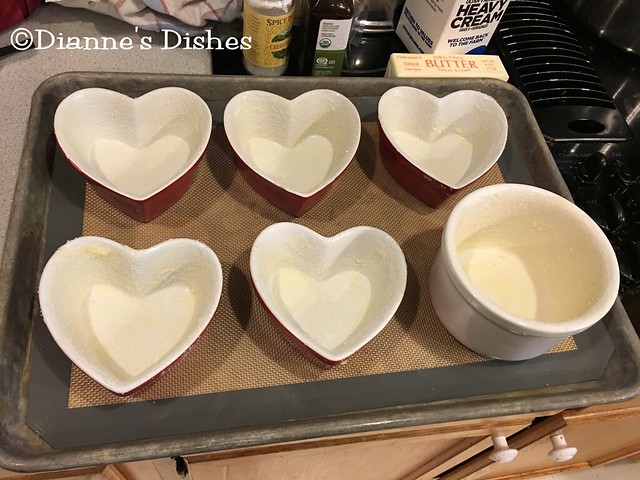
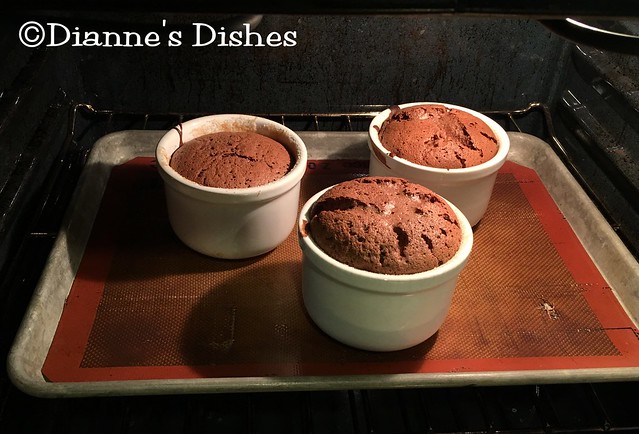
You see the smaller heart ramekins and the bigger round variety. I baked the round with the hearts first, and then baked an additional three in the white dishes.
They baked up perfectly! I mean look at this:
The “batter” was dreamy too:
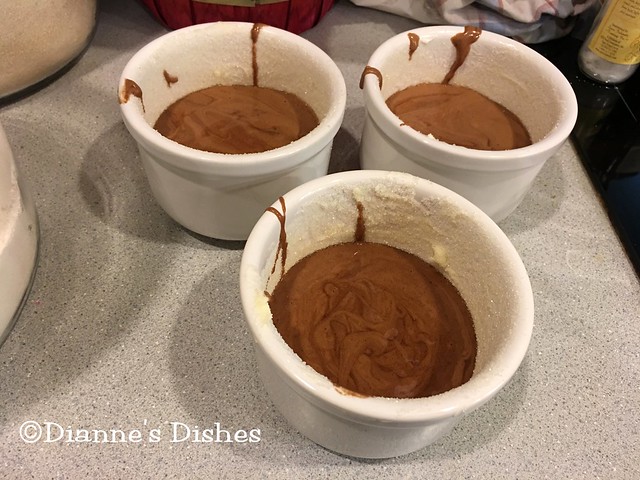
Very smooth and creamy. Also airy, which I suppose you’re looking for with a soufflé.
The bigger ramekins baked up nicely as well:
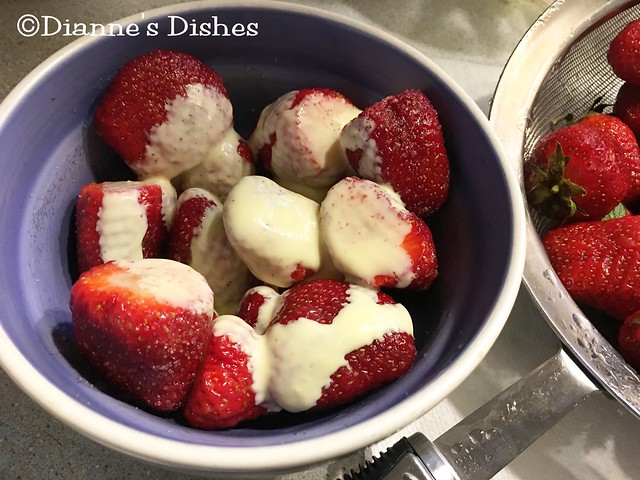
Now let’s talk about the vanilla custard sauce aka crème anglaise!
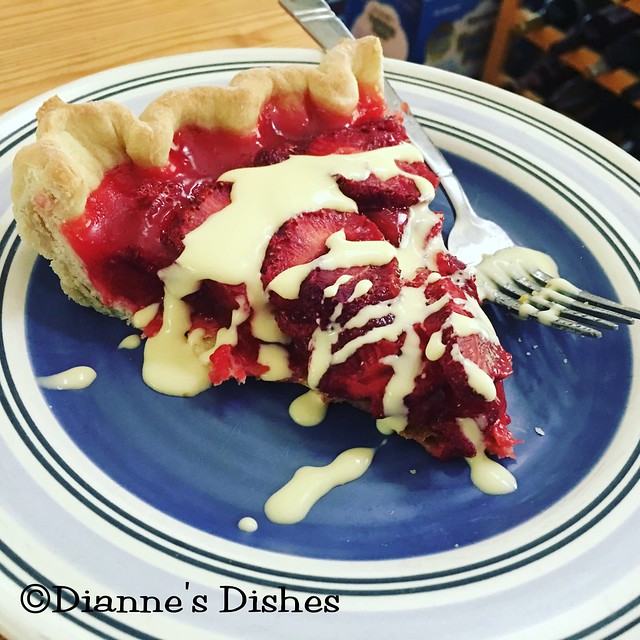
This stuff was heavenly. Absolutely fabulous! It was good warm and was superb chilled! After the soufflés are baked, you punch a whole in the center and spoon in the crème anglaise. I found other uses for it too, such as drizzled over strawberries:
Or keeping with the strawberry theme, as they were in season a few weeks ago, how about on a nice slice of strawberry pie:
I even took the basic recipe for the crème anglaise and added (you guess it!) strawberries to it and made ice cream. I’ll definitely be making the sauce and the ice cream again too!
Mine didn’t end up deflating much, though the recipe said they would. They held their shape through to the next day. Surprisingly even Jamison tried one and liked it. Given they are gluten free, he was able. He doesn’t usually venture to try new things, but in this case he did. I recently got him to try bulgogi too, but that’s a story for another time. Lex liked them too, and of course I loved them!
Sometimes it’s good to go out of your comfort zone in the kitchen. Every time I have, I’ve been surprised by the result, usually in a good way. Who knows what I’ll tackle next? 😉
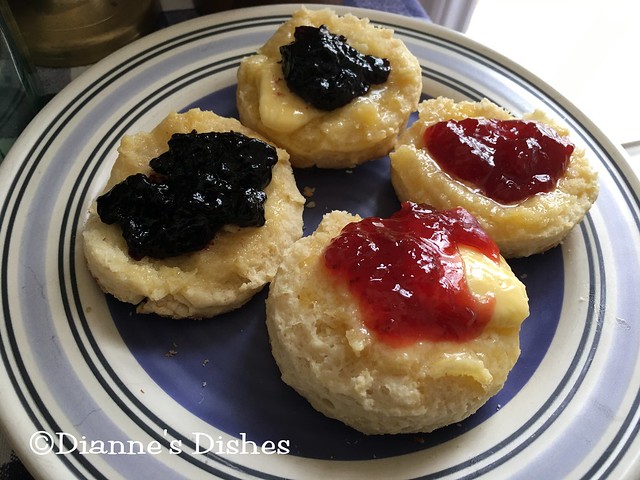
Buttermilk Biscuits
There is nothing as awesome as a fluffy, warm, buttermilk biscuits, slathered in butter and some jam or jelly. In the south they take their biscuits seriously. Every person who makes buttermilk biscuits think theirs are the best, and their families will adamantly agree. I’m here to tell you I think mine are the best, because of course I do, and they really, really are! 😉
My mom made bread occasionally, but I don’t ever remember her making biscuits. That didn’t stop her from helping me figure them out though, and I actually won a ribbon in 4-H for buttermilk biscuits. In all honesty, there weren’t many entries, and I remember mine were sort of misshapen, but they tasted really good. After that I didn’t revisit buttermilk biscuits again until after Jamison and I married. Even then it took me a while to get them exactly how I imagined them in my head, and it was long after we figured out Jamison is allergic to gluten, but I finally did, and these are the result.
The biscuits mix up quick, and in no time you have fluffy, warm pillows of goodness, ready for your favorite butter and toppings. We’re talking 30 minutes from start to finish. They’re good for sausage and ham biscuits too, or breakfast sandwiches, or they’re perfect just as is. No matter how you slice them, you’re looking at buttermilk biscuit perfection!
What You’ll Need:
2 cups of unbleached, all purpose flour
1 tablespoon of baking powder
1 teaspoon of sea salt
1 tablespoon of sugar
1 stick of butter, softened
Buttermilk
1 pastry cutter or fork
Flour for the counter and cutter
1 biscuit cutter or small glass
Preheat oven to 425 F.
In a large bowl stir together flour, baking powder, salt and sugar until incorporated. Using a pastry cutter or a fork, cut the butter in to the flour mixture until crumbles form. Next stir in butter milk until dough forms. Start with 1/2 a cup and slowly add more until dough forms in to a ball. It may be a bit between crumbly and sticky at the same time, it’s funny like that, but that’s ok. Usually you’re going to use about 1 cup of buttermilk total, but you might need slightly more, or slightly less, depending on the humidity and such.
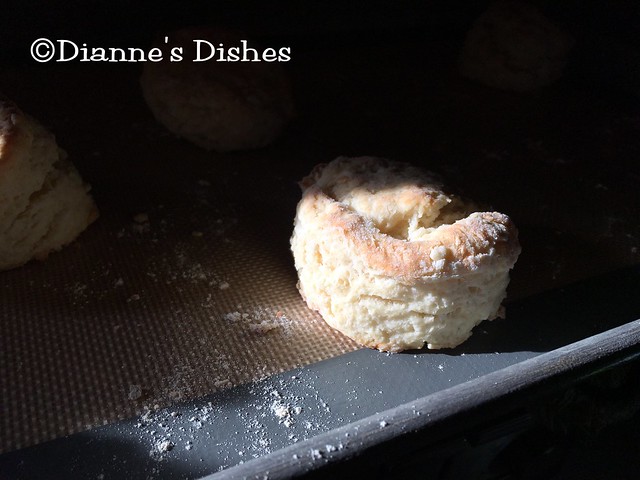
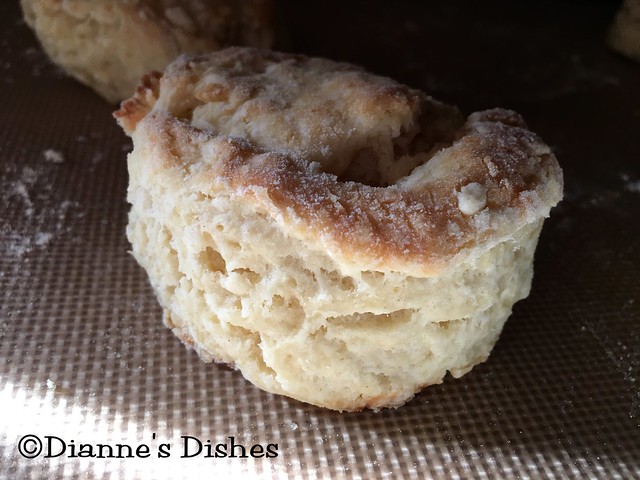
Take the dough out of the bowl and put it on a surface that has been sprinkled with a thin layer of flour. Give the dough a few kneads to incorporate all of the ingredients. If it’s sticky, sprinkle on a bit more flour and knead it in until it’s a relatively dry dough. Shape the dough in to a round and flatten to about and inch thick. Fold the dough over on itself toward the middle from both sides and then press the dough back out again to an inch once more. Repeat this 2 or 3 times.
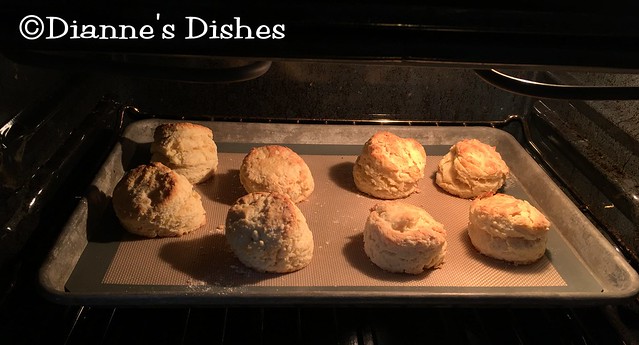
After the final press, take a biscuit cutter or a small glass and dip it in flour and cut your biscuits and place on a baking sheet that has been lined with a silicone baking sheet or parchment paper. Cut the dough until you run out. You may need to shape the last of the dough in to a round for baking. Depending on the size of your cutter, you’ll end up with 8-14 biscuits, give or take.
Bake for 10-12 minutes until golden brown.
Notes: I like to use King Arthur Flour. I really like their products. I’ve used White Lilly in the past as well, I did grown up in Tennessee after all, but I really prefer King Arthur.
I use organic cane sugar in everything, but regular refined sugar will work ok too. The same with the sea salt, I always use it, but table salt will work too, though I find it to be a bit more strong that sea salt, so you might want to cut it back to 1/2 -3/4ths a teaspoon if you do go that route.
A word on the folding of the dough. This is a very quick method that forms the layers of the biscuit. I mean look at these beautiful little layers:
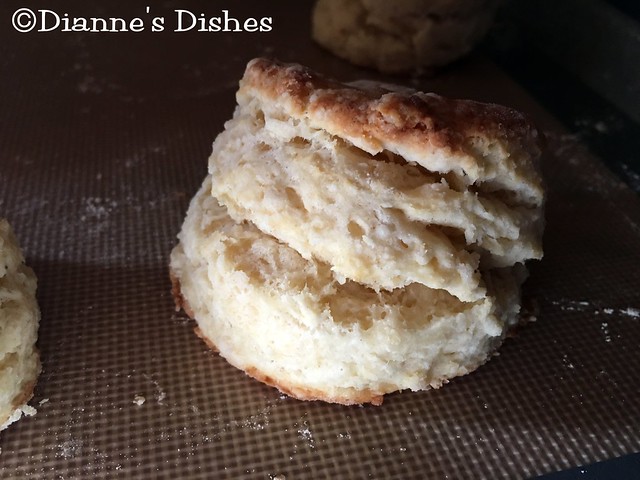
Aren’t they gorgeous?
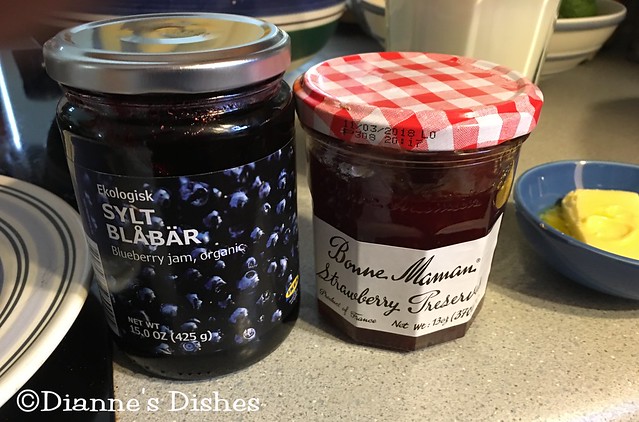
My favorite toppings are Irish butter and strawberry or blueberry jam. These are a few of my favorites:
Pumpkin or sweet potato butters are good as well.
Now it’s time to eat! Enjoy!
Baking on the 15th: Strawberry Choux Cake
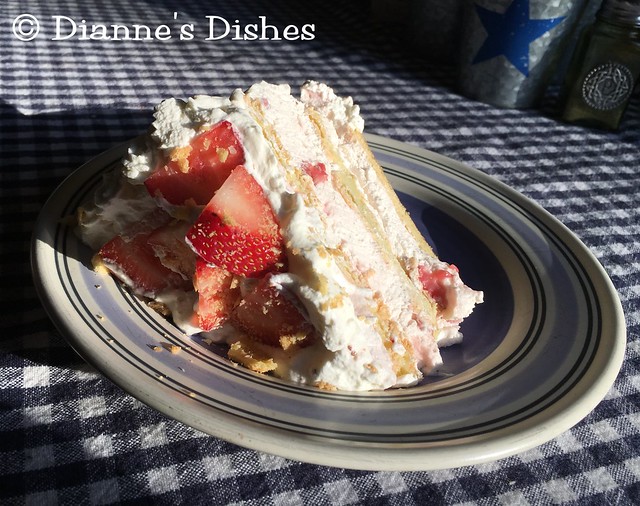
There’s a new group I’m participating with on Facebook started by Kelly of Sass and Veracity called Baking on the 15th, which is just as it sounds, we bake a shared recipe, and then we post about it on the 15th of each month, whether on Facebook, Twitter, Instagram, our blog, and/or whatever social media portal we choose. Kelly got us started this first month with a Strawberry Choux Cake adapted from The Professional Pastry Chef by Bo Friberg. Think a giant cream puff with strawberry compote cream and Chantilly cream. In short, right up my ally!
So the “scary” part of this cake was the choux. Choux can be a bit tricky, though I’ve made it once before. Years ago when I was in Daring Bakers, we made eclairs, and that was my one and only venture in to anything in the choux family. My choux failed for the most part on that little adventure, and I never got back around to trying it again. I’ve thought about it a few times, but just never got up the nerve. I mean, who doesn’t like a good cream puff or eclair? I’m a big fan of eclairs, with freshly made pastry cream, drizzled in chocolate. To me, that’s the very definition of heaven on a plate!
This time my choux actually puffed! I mean look at this crazy beast of a puffy mountain:
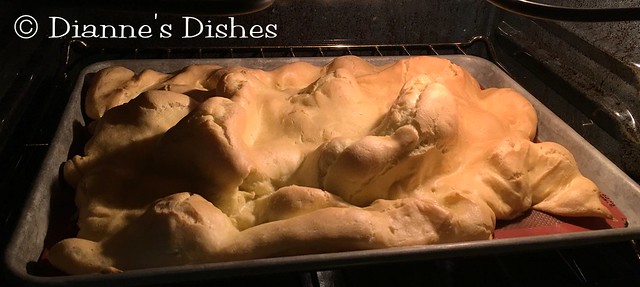
It wasn’t soggy, it was just perfect. I was very pleased with how it turned out, though I did a double take when I first glanced in the oven. I was a bit afraid it was coming after us and planning to take over the world! 😉
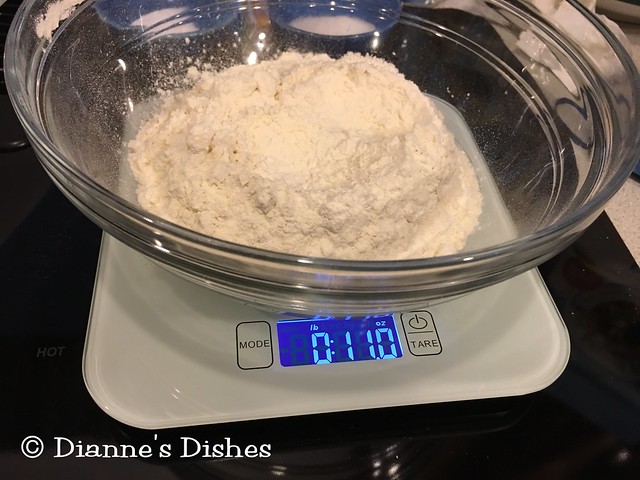
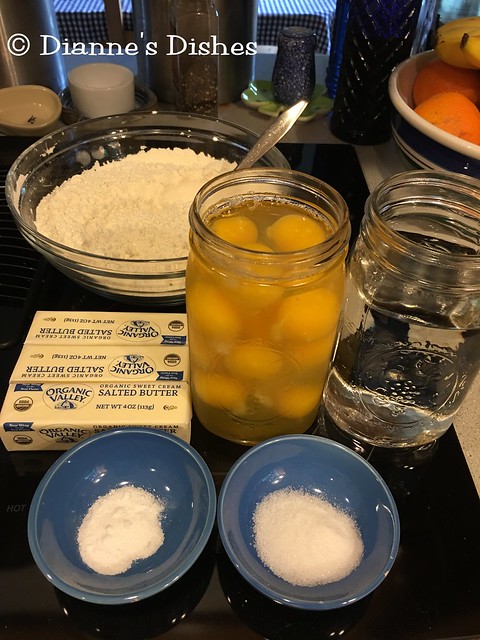
One of the interesting things about this, though not surprising since this is a very European cake, was the weighed ingredients. I have a kitchen scale, but I had never used it for baking before. We used both cake flour and bread flour, and both were weighed. The butter and eggs were also weighed, though I will admit to measuring the eggs in a quart jar, instead of weighing them. I did weigh everything else though.
This cake had quite the ingredient volume when you think about it. I had never baked anything that ended up taking 16 extra large eggs before. Another ingredient that was new to me was ammonium carbonate. I made the mistake of smelling this and wished I hadn’t. I’m also a dough taster, and that wasn’t pleasant either, though once baked the taste faded.
Here is a look at what went in to the cake:
I don’t usually measure out things before I start and dirty separate dishes, but I felt like I need to, to keep things straight for this one.
I also taped the recipe up so I could keep referring back to it:
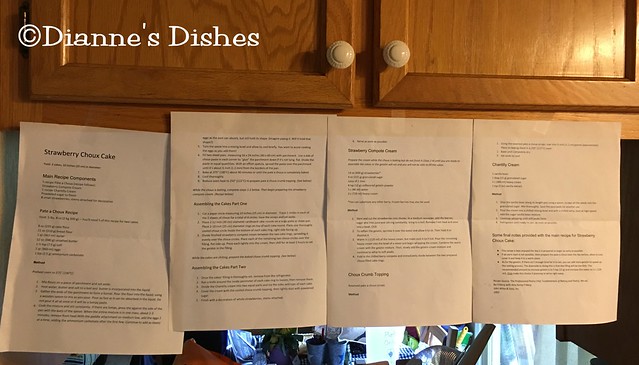
I lost count of how many times I read this bad boy through from beginning to end, and in bits and pieces as I went, but it was a lot. Choux is a bit complicated, but it’s worth it in the end.
The first step was making the choux and then letting it cool. While the choux was cooling, you started working on the elements of the cake. The first thing you started was the Strawberry Compote component of the cake, though you didn’t finish it until the cake was entirely cooled. You cook the strawberries with some sugar and lime juice and let it cool, then you add gelatin softened in water and whip some cream, and finally you add in the chilled strawberry mixture. This is the filling for your cake.
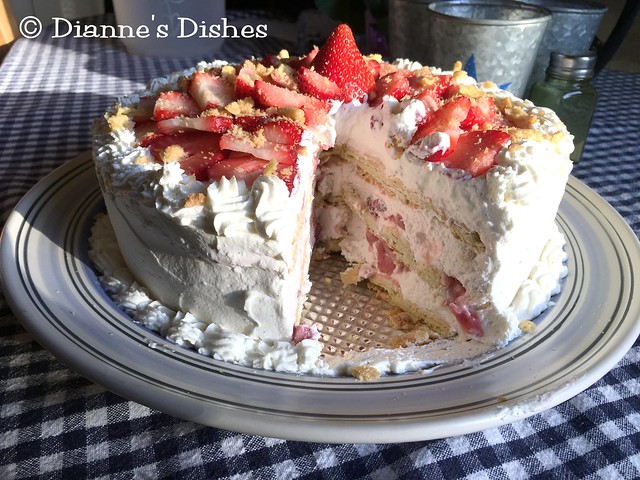
Once the choux is cooled, you cut rounds out of your baked choux. I ended up using the bottom of a 9 inch springform pan as my circle, and formed the cake inside the pan. I had 3 layers of coux, with the strawberry compote in between each layer, and on top. I let it rest in the fridge for about 30 minutes or so before the next step:
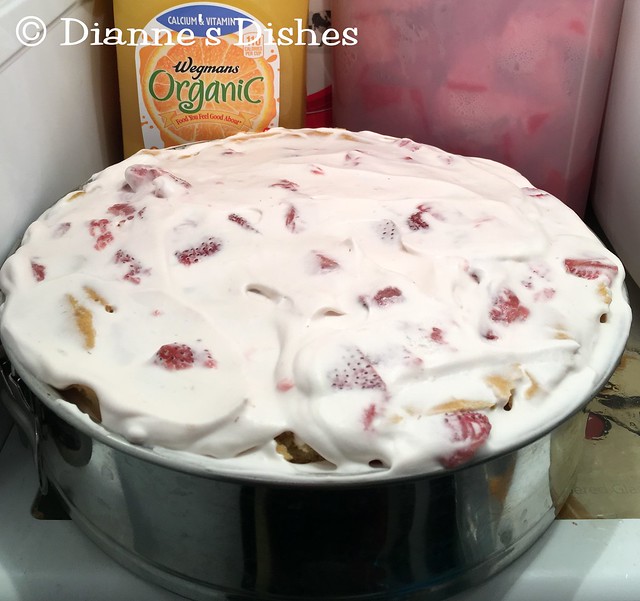
After the strawberry compote is set, you make a batch of Chantilly cream to “ice” and decorate the cake. Chantilly cream is basically just whipped cream with a little vanilla bean and extract thrown in for fun. I added in 1/4 a cup of sugar, instead of a tablespoon, because I liked my whipped cream a bit more sweetened that that.
Once it’s made, you spread the mixture over the layers of choux and strawberry compote cream. I piped a border around the bottom and the top, and then you spread out strawberries to decorate. I decided to cover the top of my cake with strawberry slices in a fan pattern on top, and a single whole strawberry in the middle. Then you take some of the left over choux bits and toast them until they crumble and sprinkle them over the top:
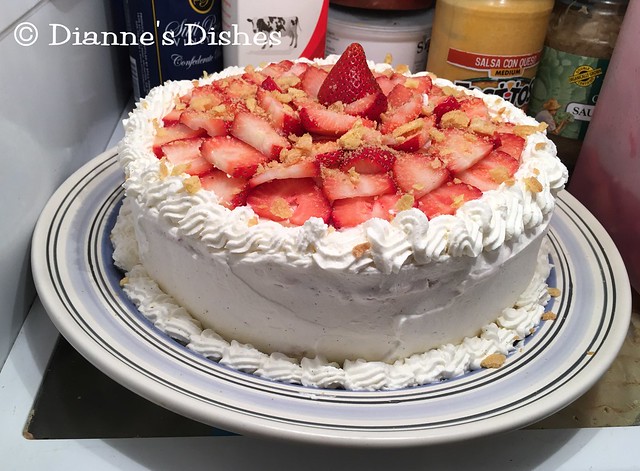
At this point you’re supposed to sprinkle it all with powdered sugar, but I forgot that step. I kind of wish I hadn’t though. I think it would have added an extra little pop.
Overall I really liked this. It’s not quite as sweet as our American desserts. It’s sort of fresh and light. I’d love to try it again and use blueberries or blackberries instead. I also added a little chocolate drizzle to one of the slices and it was a nice addition. This reminds me of something I saw in a bakery window in Paris. I’d definitely make it again!
Take a look at some of the other posts and their gorgeous cakes!
Next month I’m hosting, so stop by again and see what we bake next!